
Well, this is a little embarrassing. We finished renovating our 1970s main bathroom AGES ago... during which time we went on our honeymoon, I got pregnant, had a baby, we've renovated our kitchen, laundry, floors and windows... and yet I’ve never actually got around to doing a full before and after story of our bathroom reno on here.
I think this is partly because photographing this makeover story meant I would have to actually thoroughly clean this bathroom, a concept that unsettled me so deeply I put it off for like a year.
But I think I also procrastinated on featuring this room because we had a couple of issues with this bathroom and man, nothing ticks me off like something that I have tried to do that I haven’t quite nailed. With some things (obviously not cleaning) I am a horrible perfectionist. If something isn’t how I imagined it would be, I fixate on it with growing resentment until eventually, I realise that in the grand scheme of life, I am getting worked up over something that is trivial and I cover it up with a pretty pot plant and I move on.
So let’s talk about our family bathroom makeover!
We had renovated our ensuite before this bathroom (you can see that before and after here) so we knew the process. But we are still first-time home renovators – and did we learn things with this one. On the plus side, mistakes, teeth-gnashingly frustrating they are at the time, definitely mean you learn a thing or two.
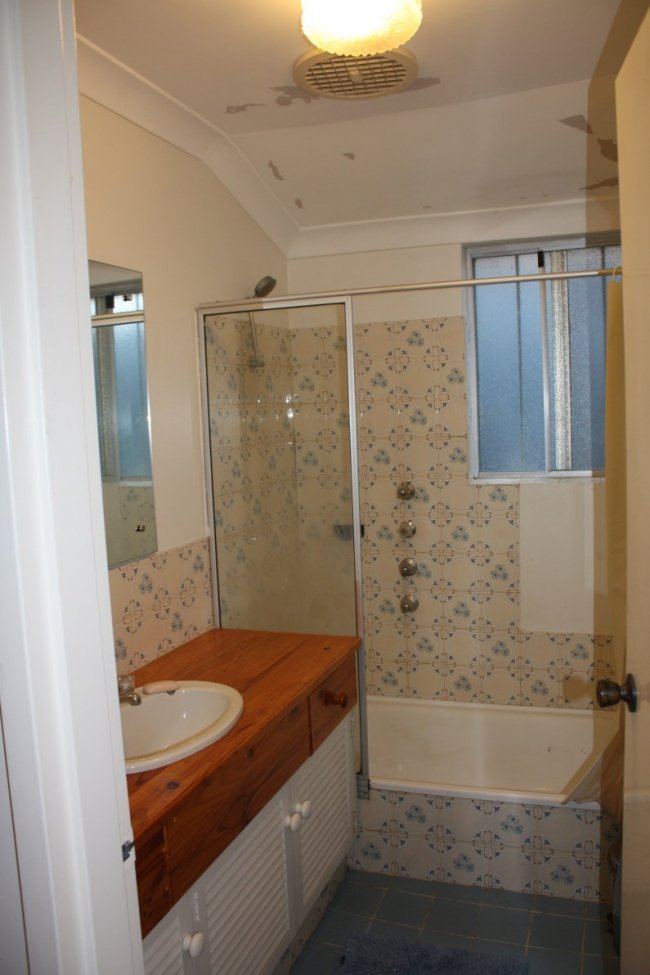
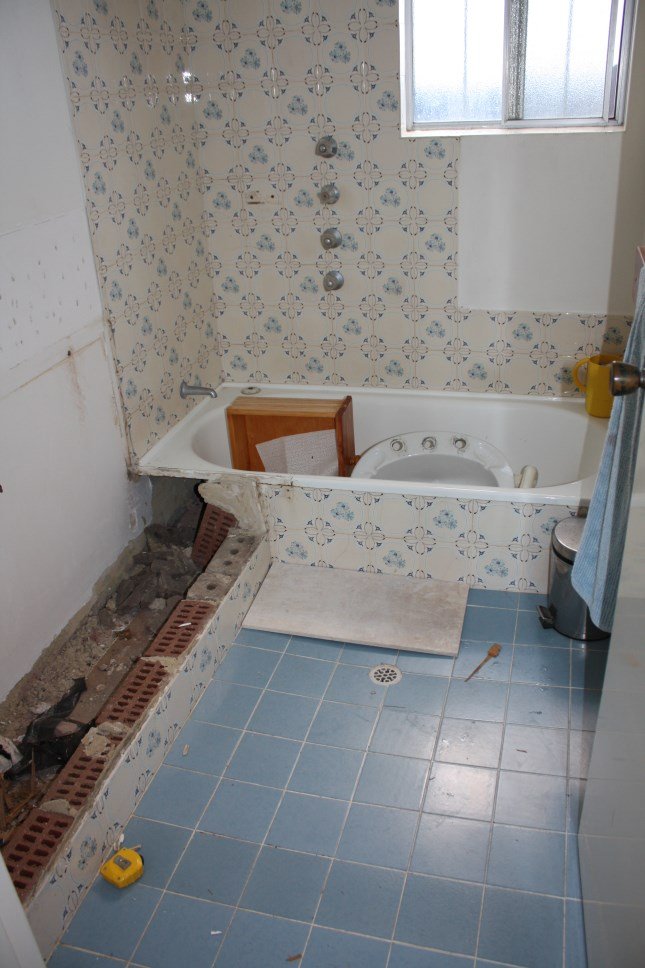
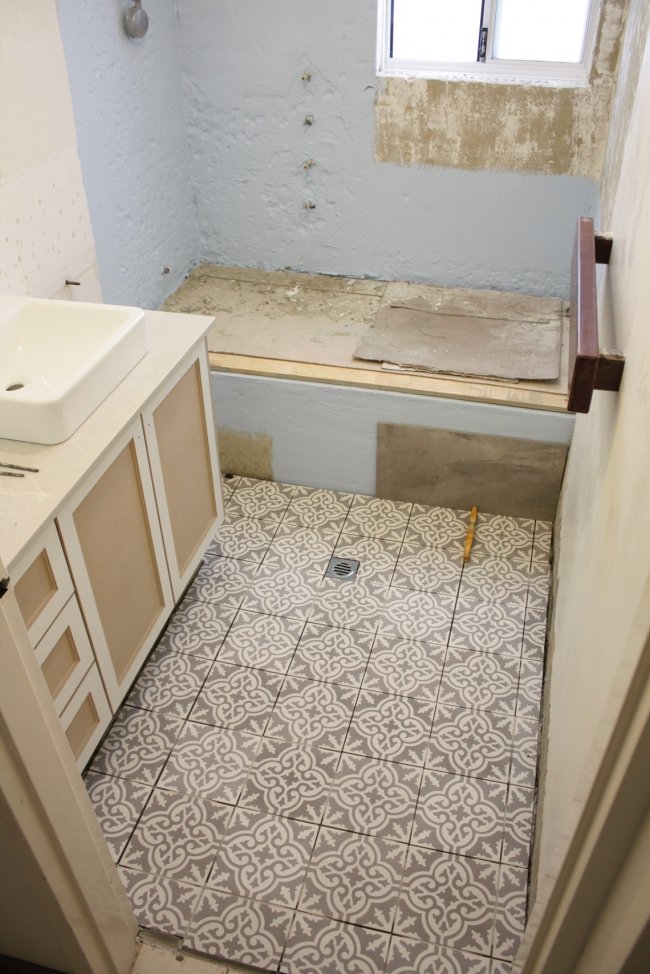
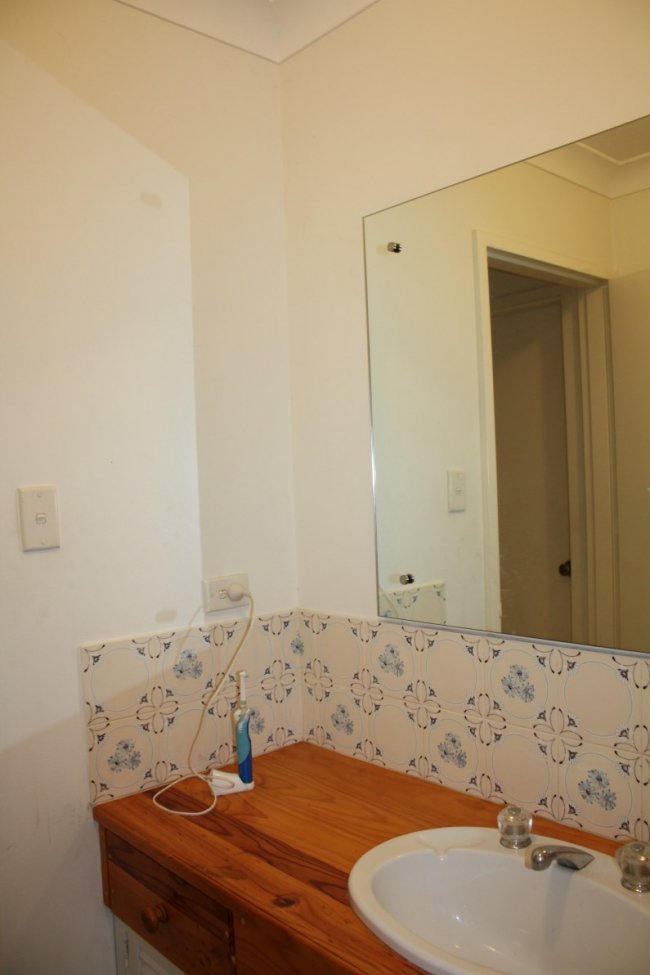
BEFORE
For this bathroom makeover, initially we had (perhaps naïve) grand plans to reuse and recycle existing materials – the bath, the vanity, even the tiles, in a bid to save some money, some landfill and some of our sanity.
You can read a refresher in this post here about how that definitely didn’t happen! It ended up blowing out into a full gut and redo.

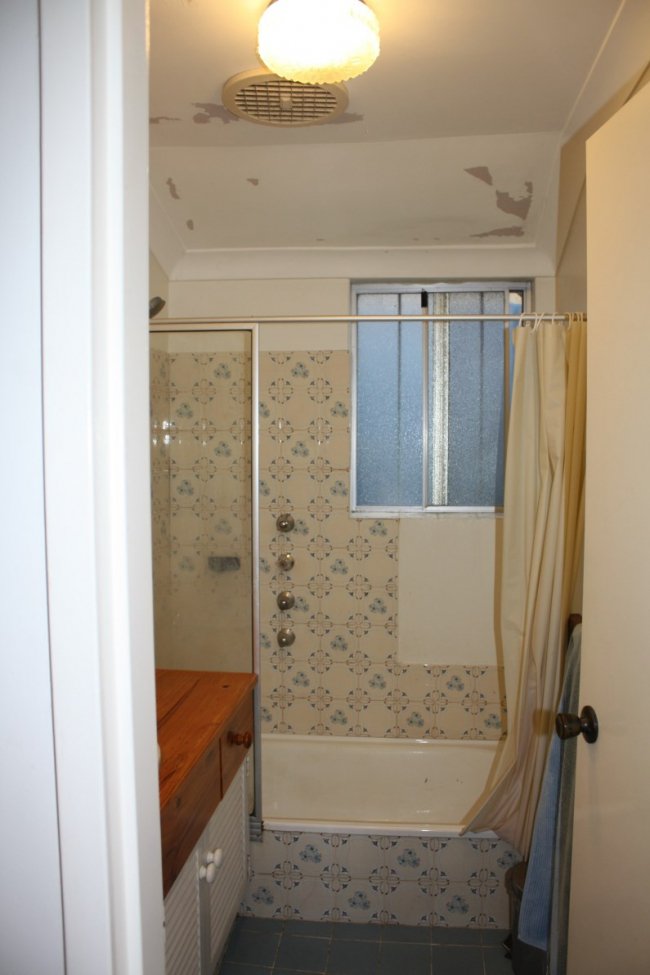
BEFORE: Probably not such a bad thing ;)
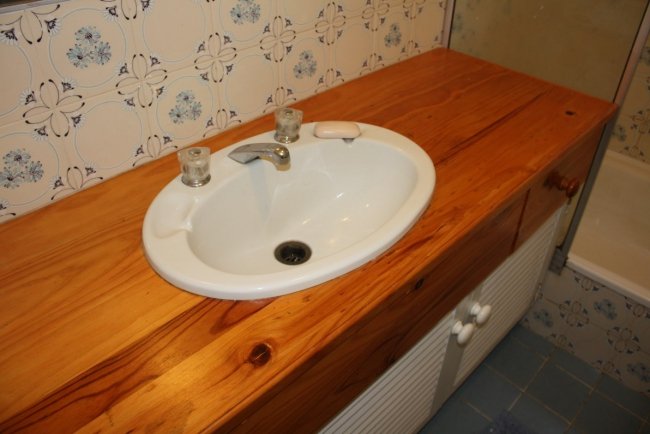
BEFORE: Ahhhh, the enticing hue of pine gone orange!
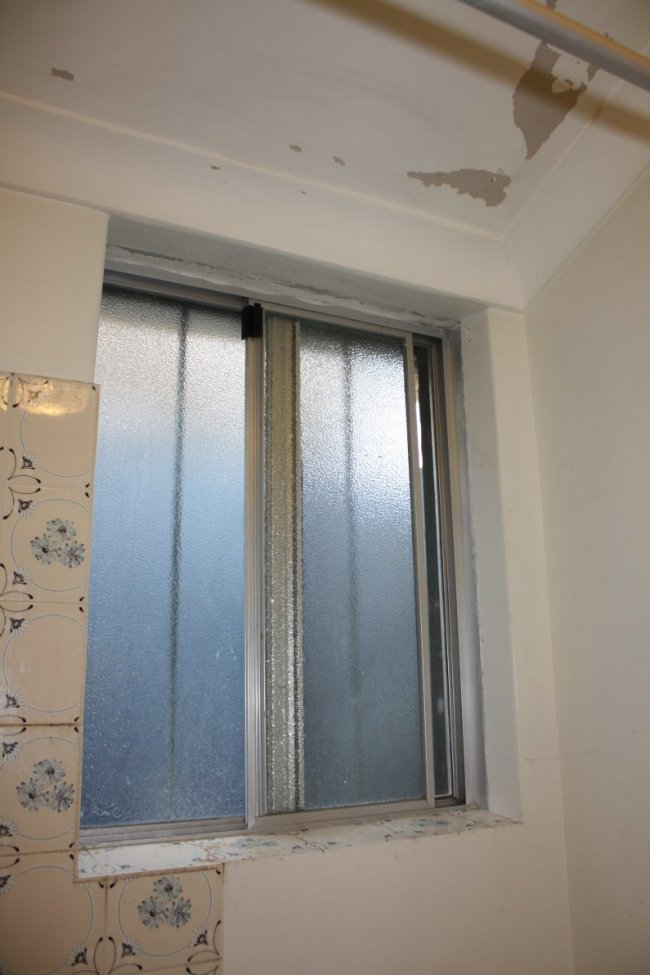
BEFORE: Complete with creepy bars on windows that made it feel a bit like you were showering in a prison.
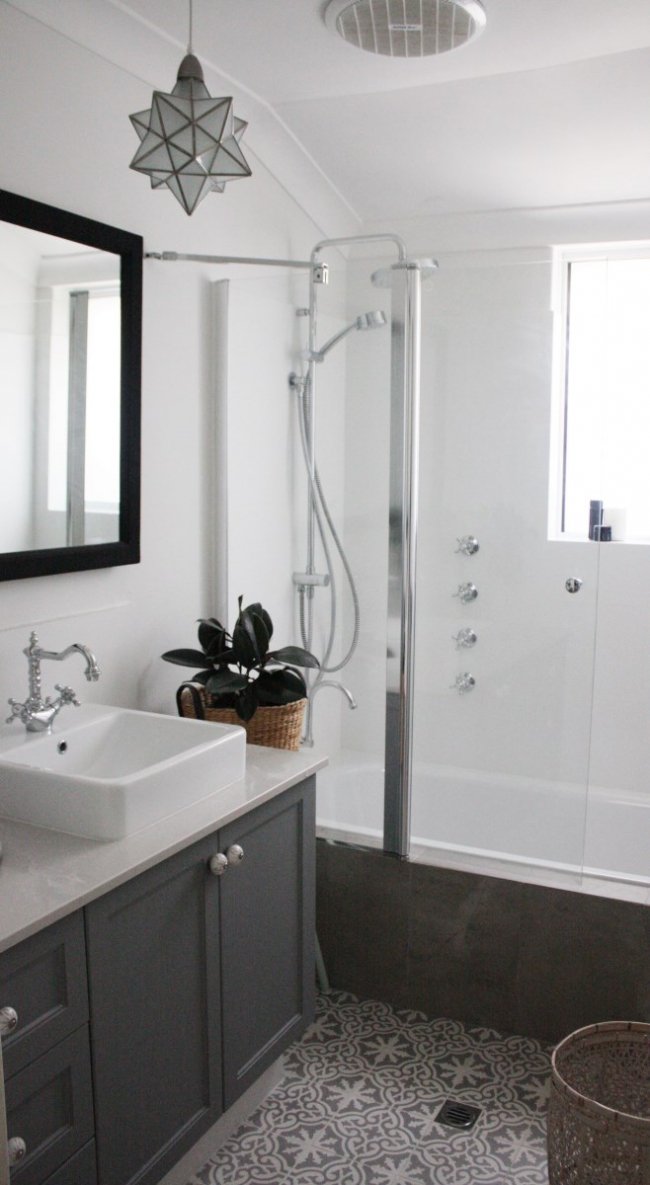
The aim of this renovation was to make it a bathroom that would be ideal for a baby one day and also ideal for washing a dog. So we put in tapware with both a rain shower head and a handheld option. While not the prettiest shower tapware in the world - I feel like it looks a bit busy for the small space - it is very practical.
The vanity was also shortened in length to create a gap between the bath and the shower. The idea was that the gap between the shower and the vanity wouldn’t be the dust bunny heaven of the old bathroom. Plus the gap would be wide enough to place a laundry hamper or a stool so that we could pull it out and sit alongside the bath while our future kid was in it.
THINGS I LOVE ABOUT THIS BATHROOM
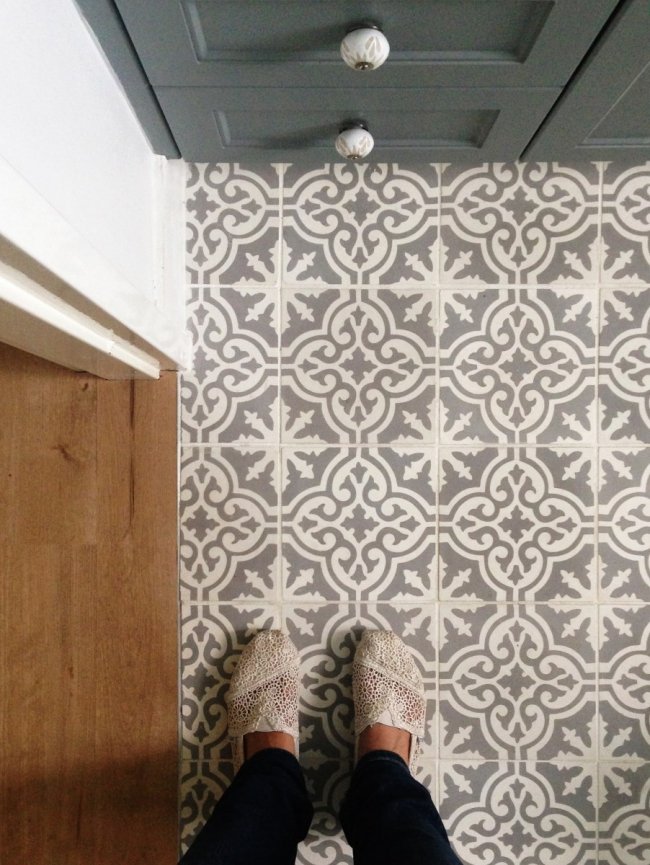
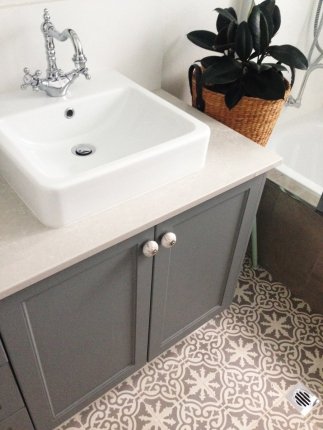
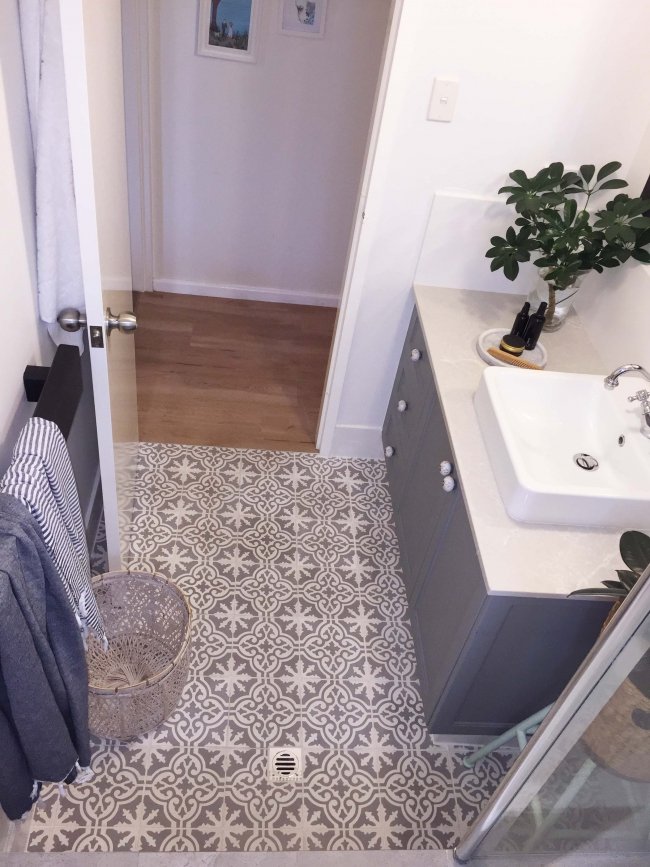
THE EXPENSIVE - BUT BEAUTIFUL - ENCAUSTIC TILE FLOOR
When the bathroom ballooned from ‘cosmetic makeover’ to ‘full gut and retile’ all I could gleefully think was, “Now I can get my encaustic tiles!” I’m still a BIG fan of encaustic and patterned tiles. In recent years encaustics and patterned tiles have experienced a massive resurgence in popularity, and for good reason. They can be just beautiful. I have loved the classic Moroccan pattern we chose for years.

I know what a lot of people say when it comes to encaustic tiles - do you dare go a strong pattern when it comes to something as long-lasting tile? What if you get sick of it? (I am thinking of my fevered passion for damask in 2009, which I thought would never end… four rhinestone and damask-themed weddings I attended later, it did). I guess when it comes to tile you want to be pretty confident of the pattern you choose. All I can say is, it’s been two years since we finished our bathroom and I’m not yet sick of our encaustic tiles. I love them just as much as the day Mr Nerd laid them.
You do have to be a little brave to go with encaustic tile for another reason – they are not cheap! I got them from Sonya from Jatana Interiors – the original, best (and to my knowledge the only) makers of traditional handmade encaustic tile in Australia. They are based in Byron Bay but they will freight to Perth. They were $165 per square metre, which meant 7 boxes for our 3sqm required, so $554.40 for the tiles; plus $184 for delivery. I justified the price as it was going to be the ‘wow’ factor of the bathroom and because I freaking, freaking love them. Other girls spend their money on shoes. I buy tile.
Three more things to know about encaustic tiles – they require regular sealing with an (expensive) product called Floorseal, you have to be pretty careful about cleaning them (no harsh chemicals), and a pro is that they feel nice underfoot and are non-slip, so extra great for a family bathroom. While they may not initially seem like the most child-friendly choice, we’ve found them really durable.
THE CONCRETE-LOOK TILES
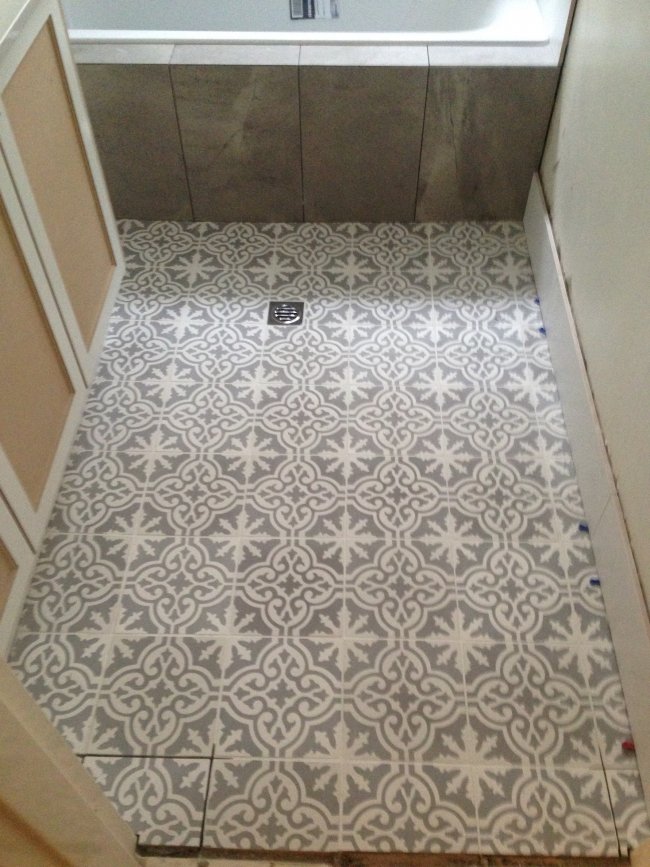
I actually distinctly remember showing Mr Nerd a lovely moodboard I made, including the grey tile, and asking him, “What do you think of this tile in our bathroom makeover?”
“I don’t like them,” he declared. “Yuck, yuck, yuck. YUCK.”
I was so annoyed. Could NOT convince him. He was as stubborn as the donkey that stopped dead in its track when I was 11 and playing Mary in the annual Sri Lankan Association children’s nativity play. I rode this donkey into the Dianella Scout Hall full of Sri Lankans singing “Little donkey, carry Mary” and they spotlighted us and the donkey froze dead in his tracks.
I don’t know what it was that made me try Mr Nerd again two weeks later, but I did. “Look babe, look at this tile,” I said. “Wouldn’t this look great in our bathroom makeover by the bath?”
“Yeah, that’s awesome. Get it.”
Men are so weird. I wisely didn’t say anything else; I just ordered it before he could change his mind AGAIN. Remember that Steve Jobs quote where he said, “A lot of times, people don’t know what they want until you show it to them.” Same thing goes for your home and your partner. Your partner doesn’t know what he wants. YOU TELL HIM WHAT HE WANTS.
Oh and these grey tiles were a special order item from Bunnings, believe it or not, and not too expensive either at $43 for a box of five.
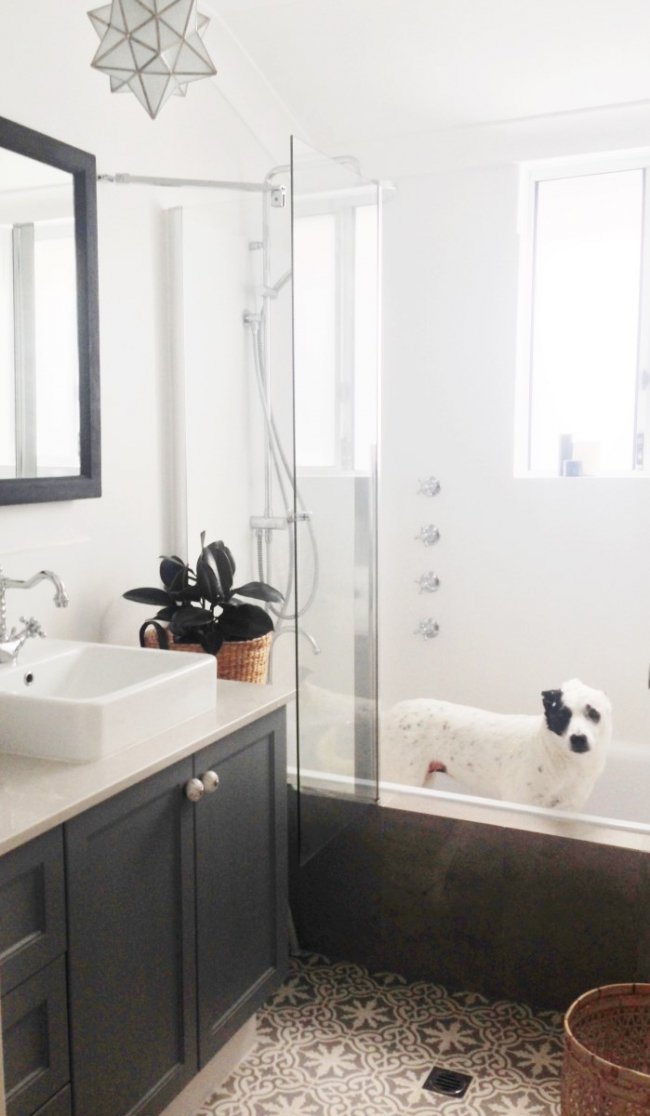
AFTER
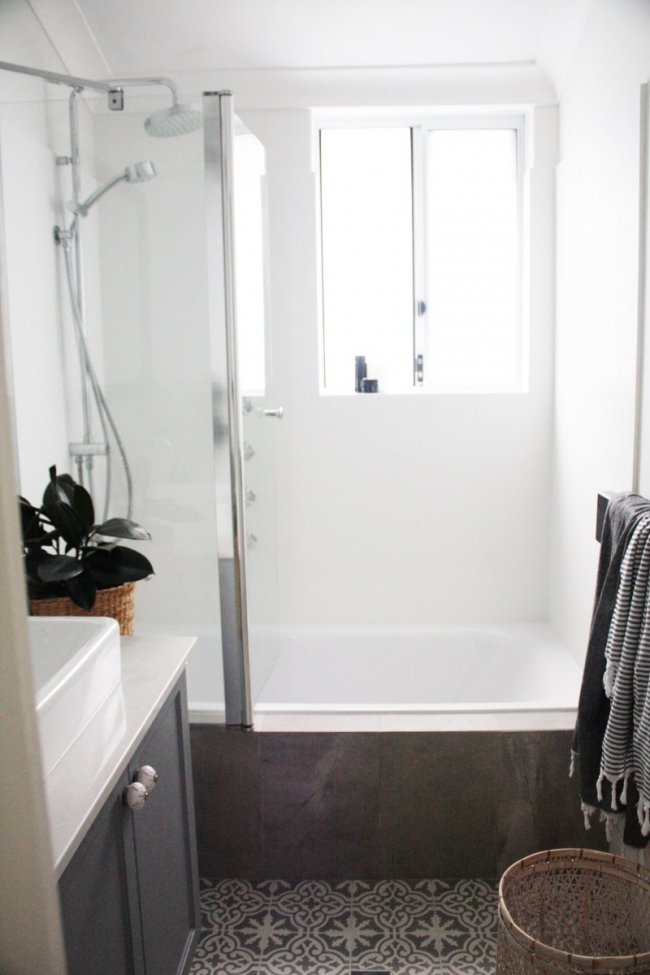
AFTER
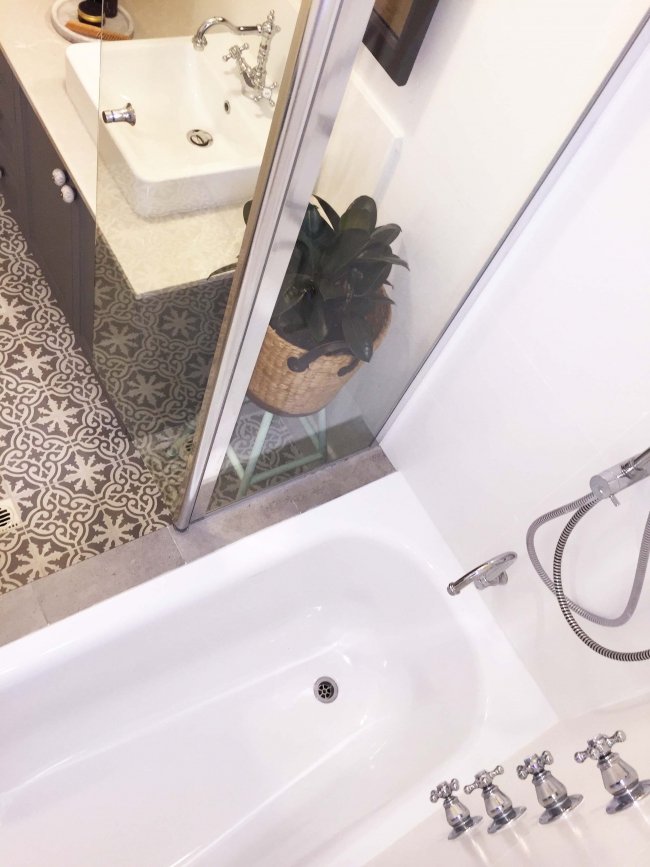
THE BATH
I remember an architect buddy advising me to pull out the bathtub. “You won’t need it,” they said. “Who wants to clean a bath? You can just hold the baby while you’re in the shower, wash them and hand them over to your partner to dry.” I see their point but I think it’s just easier to wash little kids in a bath. And if you’re planning to sell later on, a home with a bath can be a selling point (and in our neighbourhood, family homes are what buyers and renters want). Little Nerd also weighs about four tons (enough for me to single-handedly put my chiropractor’s sons through university). I also love a relaxing bath myself, even better with a glass of wine aka Mother's Elixir.
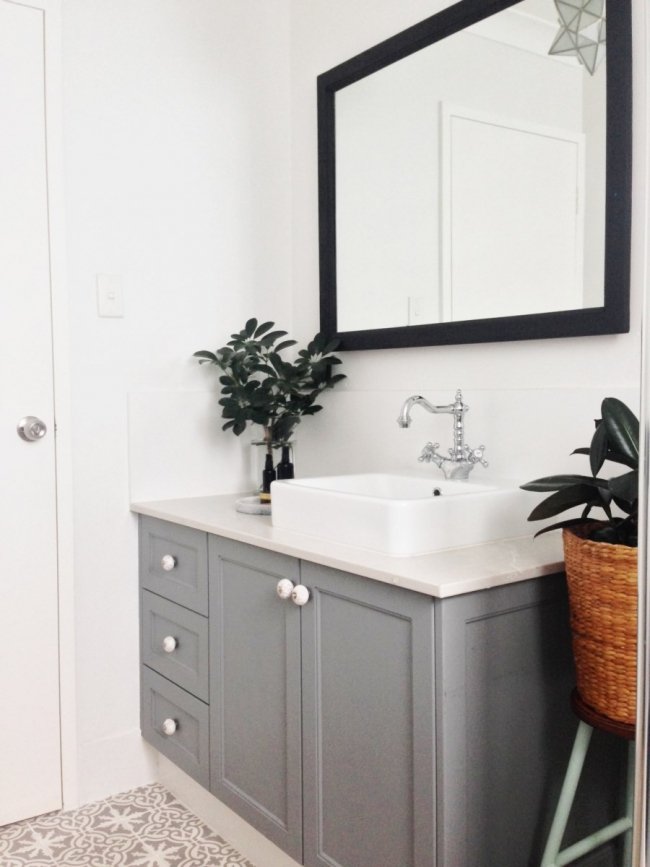
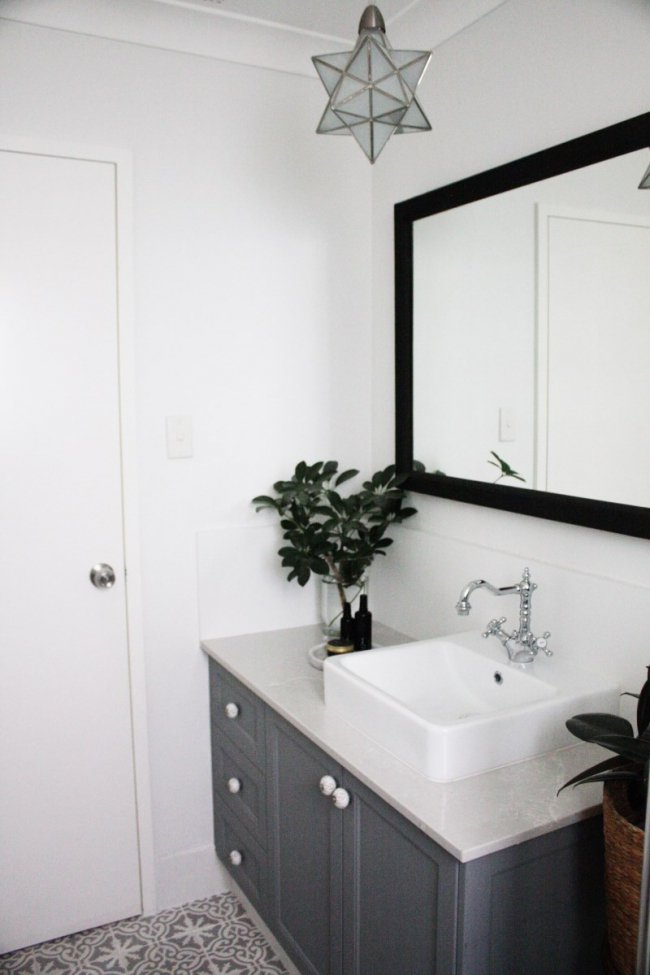
THE VANITY
All I wanted was a classic-looking painted vanity with a beautiful stone benchtop and a small above-counter sink. As it turns out, this vanity is so easy to find on Pinterest, impossible to find in our price range in real life. It seems 90% of the vanities you find in the shops are really modern and clean-lined, which is not what I wanted for this bathroom, and/or they have a ginormous sink and only a thin strip of benchtop which I always feel is impractical. Yes the oversized sink looks impressive, but where do you splay your 854 products when you’re getting ready; where do you rest your hairdryer or your GHD? In the sink? Even I know that’s probably not a fabulous idea. So I am a hater of big wanky sinks. (I’m probably jealous because our house has tiny rooms and would never have the space for a big sink ever).
BEFORE
AFTER
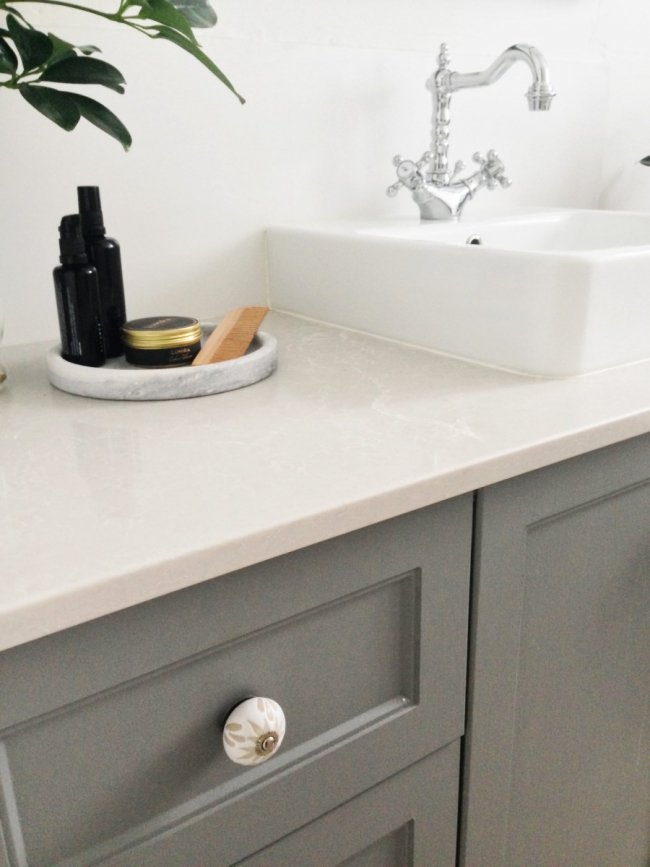
After a fruitless search, I had this vanity custom-made by a great local cabinetmaking company (that no longer do them). It looks like painted timber but is actually painted MDF (you have to use a waterproof primer first) which my cabinetmaker said is less likely to warp in a wet room than timber. I really wanted a vanity where I could change it up if I felt like it just by painting it or changing out the knobs. The benchtop is CaesarStone Alpine Mist, a colour I fell in love with when I saw it in their new season launch.
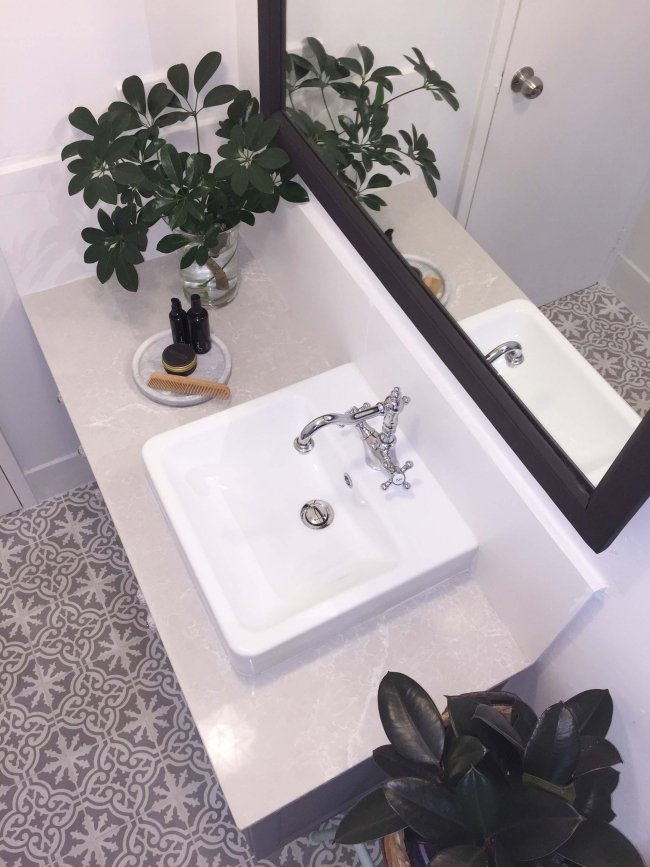
I bought the tiniest square above-counter sink I could find (from Bunnings) and the pretty ceramic knobs from a shop in Fremantle. Later learned you can get the same cabinet knobs on eBay way cheaper than in the shops here; type in ‘ceramic knobs’ – there are so many beautiful ones. My interior designer friend Nelly Reffet from Twinkle and Whistle recommended I paint the vanity with Dulux Timeless Grey and I love it.
THINGS I DON’T
THE SPLASHBACK TILING
We had boxes of these white tiles left over from our bathroom renovation that a tiler friend got for $20 a box, and that was pretty much the reason we decided to use them again. Save some money. They’re nice, simple, easy to keep clean. In hindsight, while I love them to the bath and shower area, I wouldn’t have used them to the vanity splashback – they are way too thick. And this brings me to the next problem.
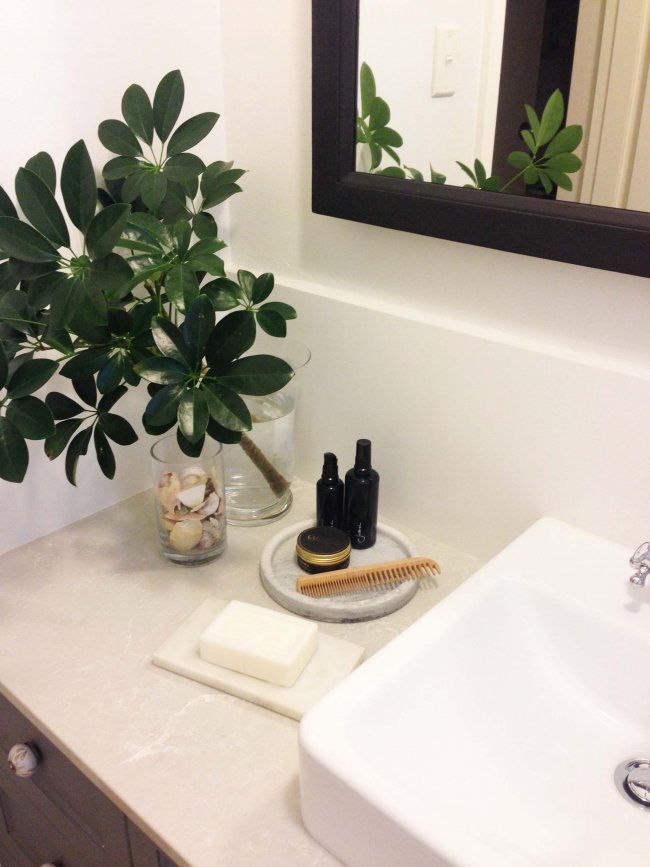
THE VANITY SINK POSITION
So here’s the problem we had with the vanity. After the cabinetmakers made the vanity, they sent round a guy to install it. He asked me if I wanted to sink to butt up against the wall or did I want to be able to fit a splashback tile in between the sink and the wall. I said the latter option, gave him a piece of the tile and reminded him to leave 5mm for the glue. No problem, he said. So there was a gap between the sink and the tile.
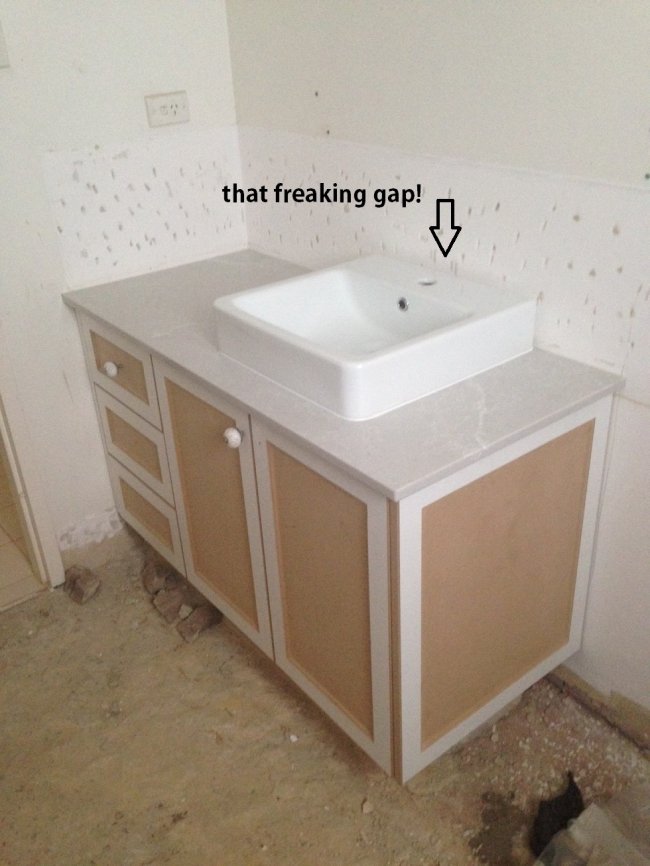
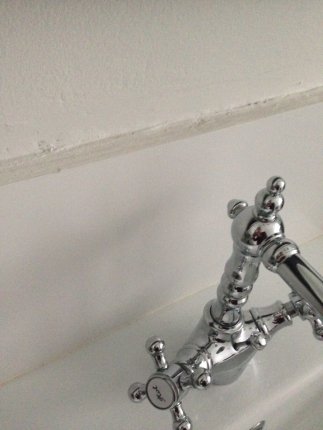
ABOVE LEFT: That grout! ABOVE RIGHT: Distraction with foliage...
Silicone was suggested, with a different, thinner splashback tile. But the strip of silicone still would have been about the width of my little finger – and some of you will know how dirty silicone gets with time. Another option was that the entire wall be replastered to push it out further. Neither option was appealing to me. Mr Nerd and I did a lot of (extra) shouting that week.
Lesson learned: Glue your sink down yourself after you tile (if possible) and if it’s done before you tile, make sure, 100%, that there is enough space for your tile and your glue.
The problem was solved, somewhat, by our (unhappy, perfectionistic) tiler who cut a piece out of a tile to fit it around the sink. While this was okay, it meant that the thick tile juts even further out from the wall. Too much. So the next problem this created was that I did the final grouting myself. I’ve grouted on our projects a few times now and not going to lie, I like it (it feels like I’m icing a giant cake) and I’ve always managed to do a very nice job of it – well, not this time. With the gap between the wall and the tile so darn thick, I made a thick, clumpy mess of the grout. Ughhhhh. It ticked me off every time I looked at it and I couldn’t figure out any way to make it look better.
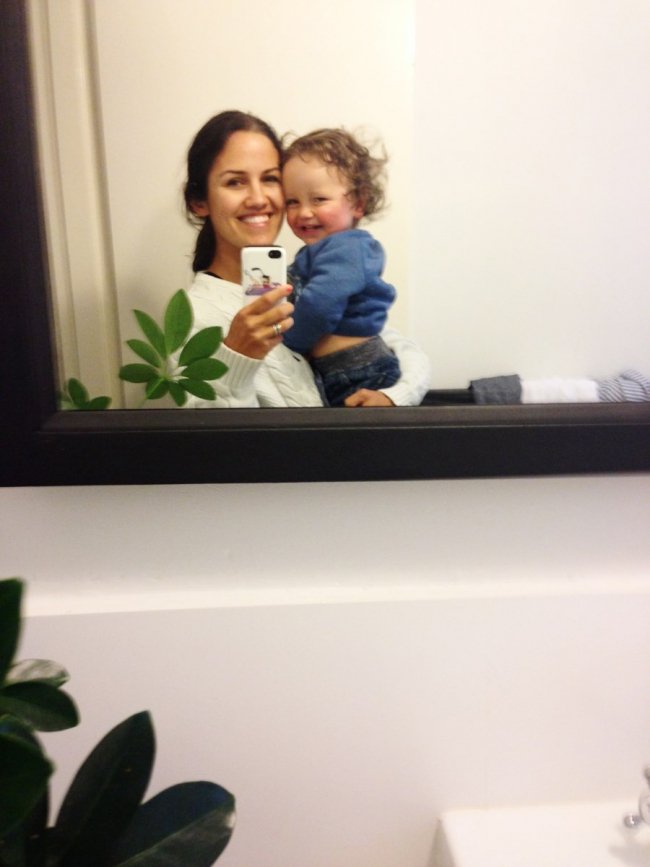
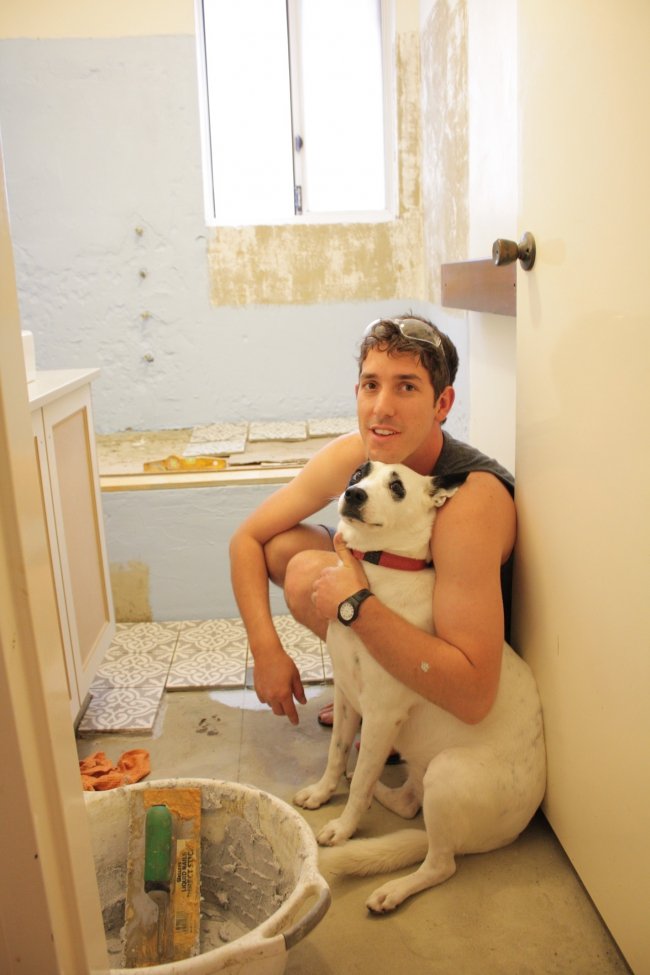
Bathroom selfie time! I look tired as hell, because I am. This little monster is happy here, but he made it his mission to make taking these bathroom photos and putting this post together as hard as possible!
In the end? I put a plant in front of that grout and focus on the things of the bathroom I love – the floor, the star pendant light that I love and Mr Nerd hates, the grey tile. The fact that it’s been a lovely bathroom for Little Nerd. Overall - I’m happy :)
Have you ever made a renovating or building mistake that grated on your nerves at the time? How did you overcome it? Did you fix it or let it go? Maya x
Love before and after stories? See more by following House Nerd on Facebook, Instagram @housenerd, Pinterest, Twitter @HouseNerd_ or Bloglovin.


