
I am SO excited to share not only a DIY project but also a VERY cool House Nerd giveaway today!
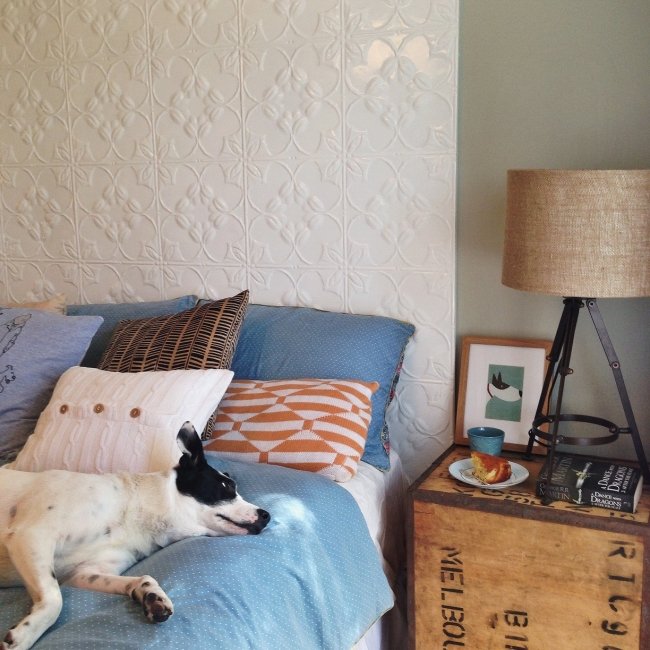
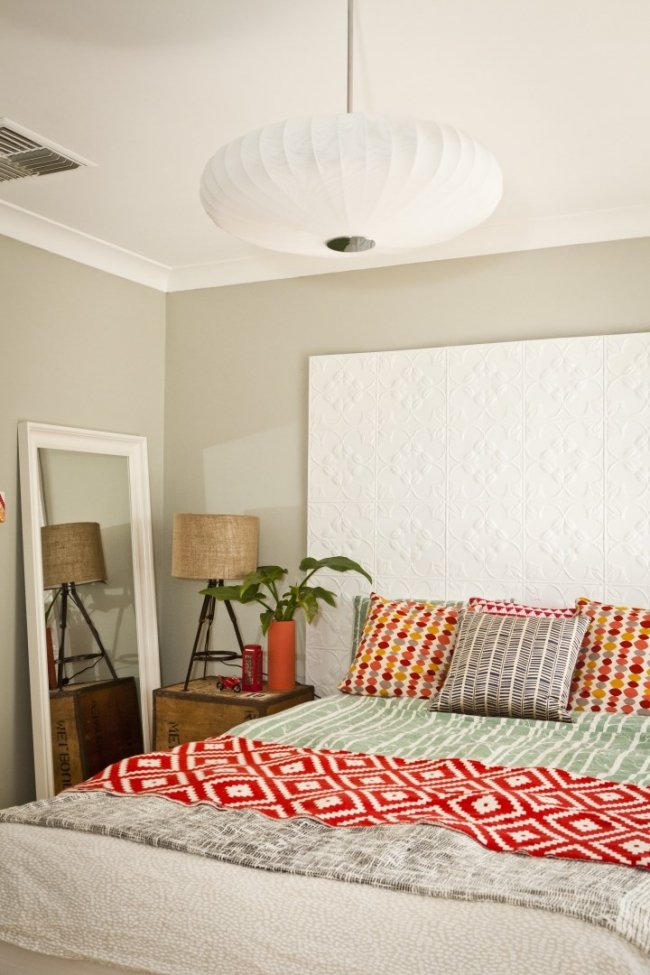
You might have recently seen my posts on our bedroom makeover, where one of the things we did was get a new ensemble bed and make a beautiful pressed tin bedhead. Courtesy of the lovely people at Forty Winks, one of you guys can WIN one of these amazing Silent Partner Florence Plush queen size ensemble beds (including a mattress and base) pictured below valued at $3,299. The Silent Partner is the fanciest top-of-the-line ensemble bed in the shop and one can be yours... sweet dreams for years to come!


Ooh and once you win it, you could even make your own customised pressed tin bedhead just like Mr Nerd and I have done! And it's super easy to enter. You can enter at the end of this post.
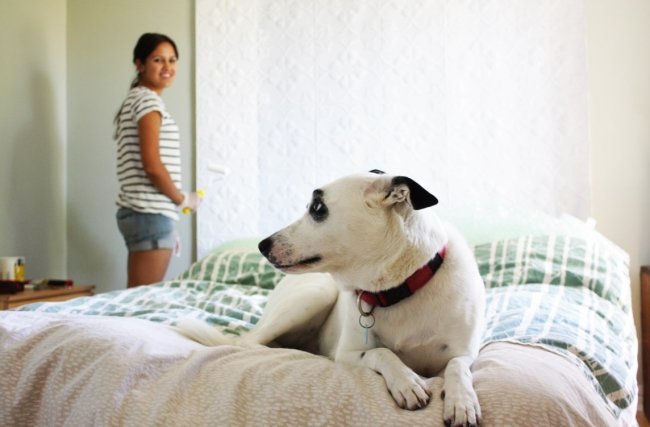
When we gave our bedroom a makeover, one of the major things Mr Nerd and I knew we had to do was upgrade our old 80s chipboard bed. When my interior designer friend Nelly from Twinkle and Whistle suggested I try making a pressed tin bedhead for our room, I was like, “YES!” punching the air like a tryhard Rocky Balboa.
I had seen the pressed tin bedhead idea before on Pinterest but would never have thought it could work in our little room – until Nelly suggested it. This is why I think it is totally worth it to call in the advice of an interior designer or an interior-savvy friend to help you with a room if you are stuck. They can look at your space with fresh eyes and envision something you might never have imagined could possibly work! I knew that the pressed tin bedhead would not only take up no floor space in our small 3 x 4m bedroom, where every inch of space counts, if tall enough it would visually create the illusion of more height and add a bit of ‘ooooh’ factor to our little room.
Firstly, we needed to replace our bed. Because we wanted something without a bedhead and to save on space in our small bedroom, Mr Nerd and I were keen to get an ensemble.

But while we were there, we did also try out the Silent Partner Florence Plush, above, just to see what things were like at the top of the line… and oh my god. It is the crème de la crème of beds. I could have fallen asleep in the shop. I wonder if people who work in bed shops have secret lunchtime power naps all the time.
With our new bed ready for pick up, the next thing to do was to start on our pressed tin bedhead. We ordered our pressed metal panels through Jean Morrison at Heritage Ceilings. Jean comes with my highest recommendations. She is efficient, super nice and really knows her stuff on all things design, installation and painting, and she has a fantastic range of really quality panels. If you are looking for pressed tin I totally recommend Jean and her team. Their office is based in Bunbury but they offer freight not just in Australia but all around THE WORLD!
Overall the whole bedhead project was not as hard as I had been expecting, although that could be because Mr Nerd did most of the hard bits. We started it on a Saturday afternoon after a morning at the beach and aside from painting, it only took about two hours.
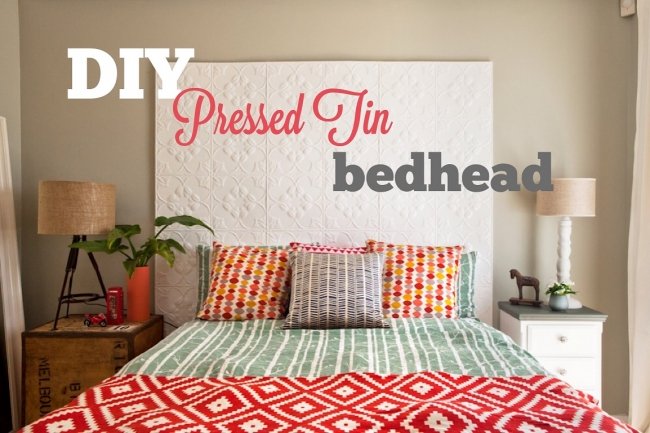
DIY HOW-TO: PRESSED METAL BEDHEAD
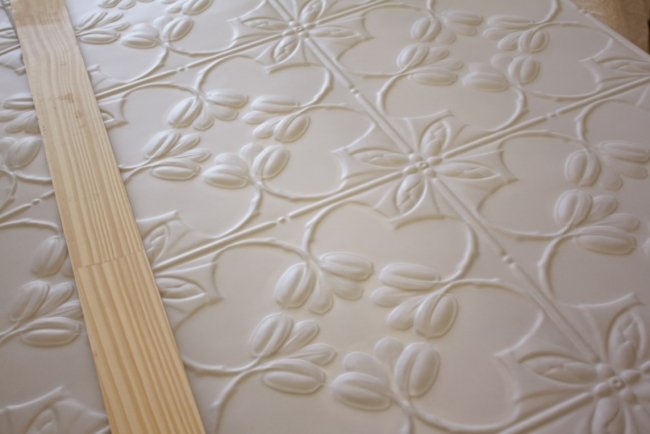
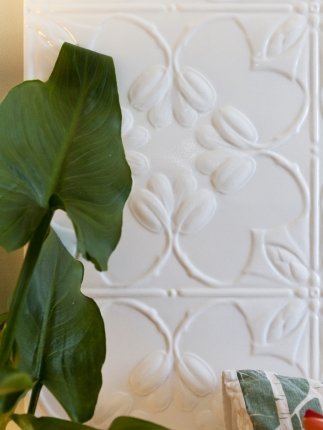
Step 1. Choose your pressed metal pattern.
Jean says the first step is to consider pattern choice in relation to the size of the bedhead. “Generally smaller patterns work best for a small area such as a bedhead but large bold patterns can work well if the measurements of the bed head suit,” she says. “Some of the designs measure approximately 60cm square so they are fairly large. It would be a pity to have to trim the outer patterns back by a few centimetres in order for them to fit into the set dimensions of the bed head. But if a person particularly wants one of the large designs for a small project thought can be given to creating a timber or MDF border/frame to fit around the panels to take up the excess in the size of the bedhead.”
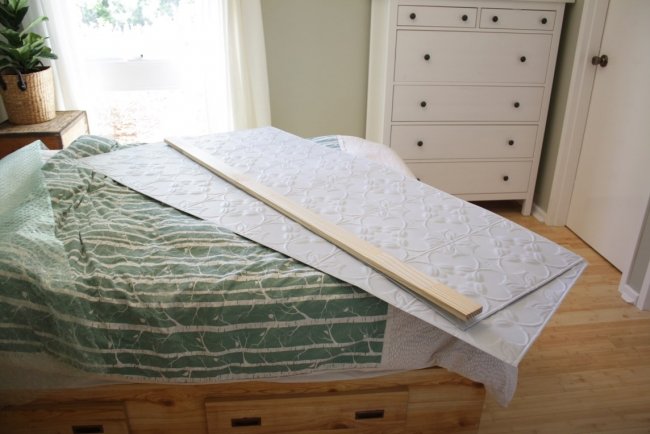
Step 2. Create a plan for your backing board.
You must nail your pressed tin panels to a substrate (no, not directly to your wall). Use a large piece of ply or you can create a frame out of MDF battens like we did, as we wanted a really big bedhead without too much weight on our walls. Jean says for a bed head the ply should be a minimum of 7mm thick. “A thicker ply can still work but it will just make the whole bed head a lot heavier,” she says.
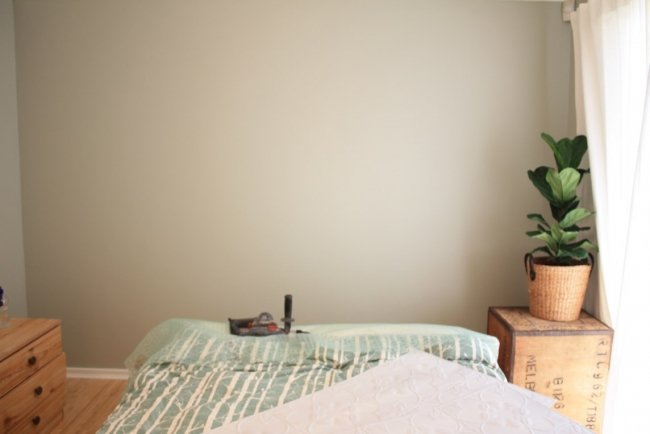
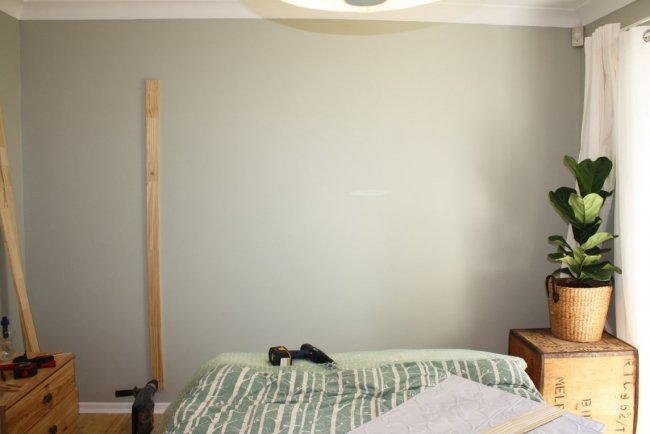
Step 3. Mark where your bedhead is going to be.
Measure out the wall and mark out even sections on either side so that your pressed tin is centred.
Step 4. Check for wonky walls.
Now measure to see if your walls and/or your ceiling are out. In our 70s house, the walls aren’t perfectly straight and in our bedroom, the wall is slightly shorter on one side. So Mr Nerd took all our measurements from the ceiling as you won’t see the bottom of the pressed tin bedhead.
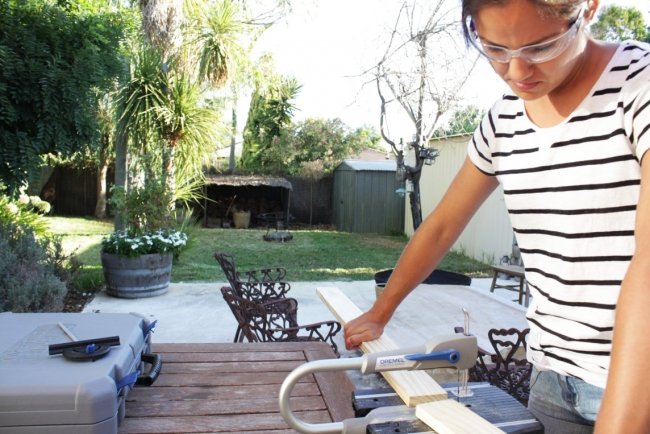
Step 5. Start cutting.
Now you have the area for your bedhead centred and square, you can begin cutting your plywood or MDF battens for your backings. We cut these using the Dremel MotoSaw so that they were the same vertical length as the pressed tin panels.
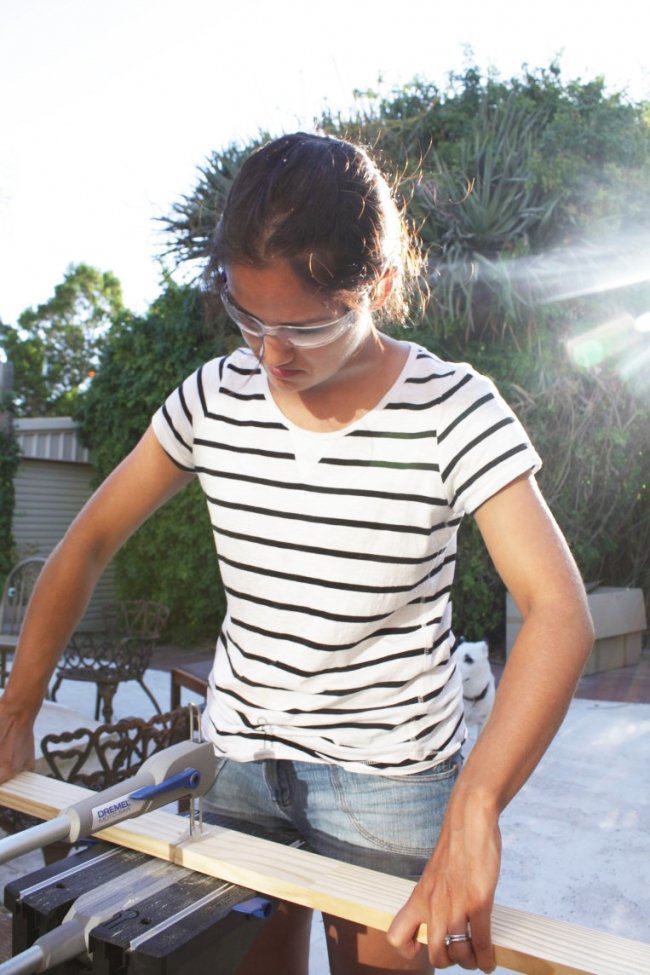
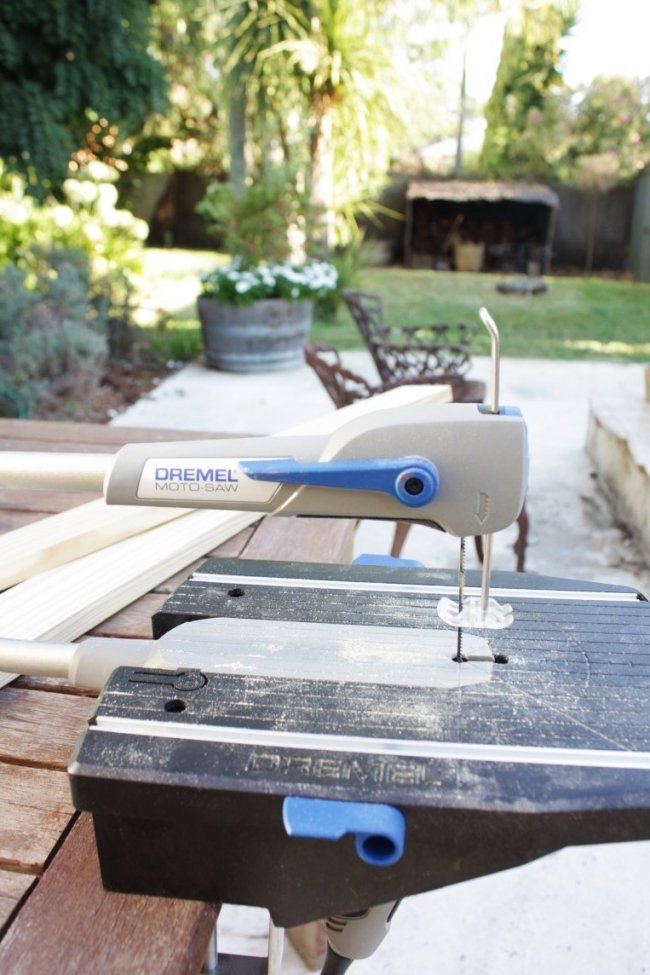
We use a Dremel MotoSaw for DIY projects like this and it is an awesome handy tool. You might have seen my post on how I used it for the first time. The MotoSaw can be mounted to a table or it can be used in a handheld capacity. It sliced through our wood in no time and it is so easy to use that Mr Nerd even lets me do it. We didn’t end up having to cut our pressed metal panels to size – but if you needed to, the Dremel MotoSaw would be ideal (perfect for smaller expanses like kitchen splashbacks). It would also be perfect for cutting to size a decorative border for your bedhead.

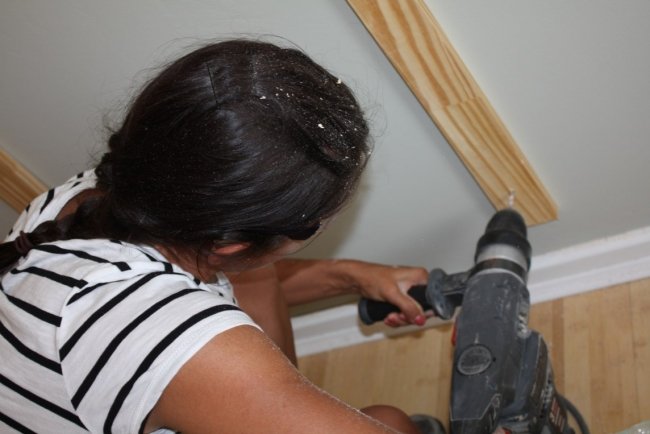
Step 6. Start mounting your plywood or MDF battens to the wall.
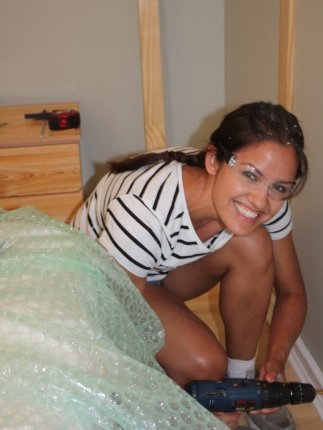
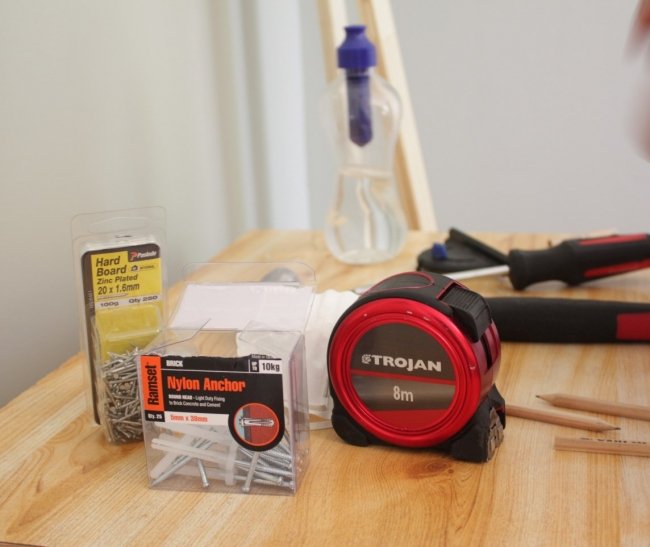
If you create your frame out of MDF like we did, you will need one batten for each edge and each join. Use a hammer drill to drill holes into your walls. We then mounted each batten with masonry plugs and screws. Make sure the head of the screw is flush with the batten otherwise it will push out the pressed tin.
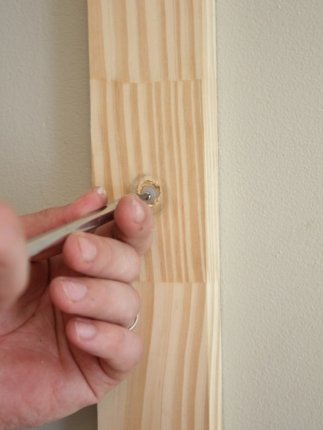
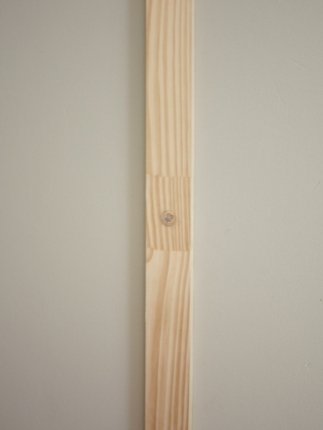
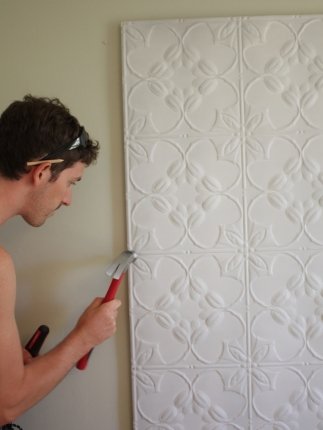
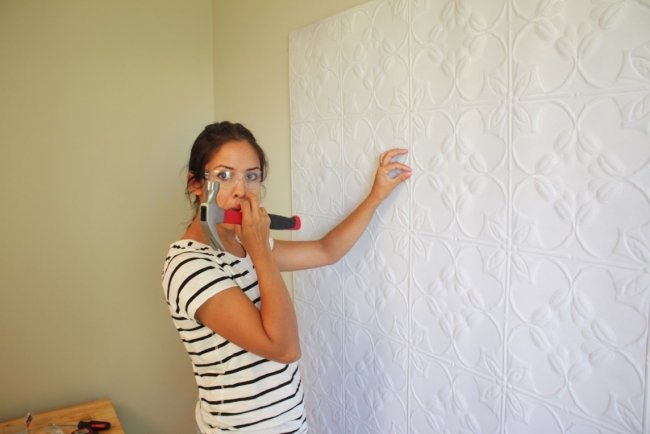
Step 7. Begin nailing your pressed metal panels into place. Never use glue!
Once the MDF is mounted onto the wall begin mounting the pressed tin with small nails in the demarcated dimples along the edges. With each successive piece make sure that you overlap and align the pattern with the previous piece.
Jean says that a popular episode of House Rules saw two of the contestants making a pressed tin splashback in the kitchen - but says it was a great example of how NOT to install pressed tin. “I’m not an advocate on gluing the panels into position,” she reveals. “Some glues are now proving to break down over a relatively short time - a horrifyingly short time in hotter climates! Some sellers of pressed metal openly tell their customers to use glue. Knowing the short amount of time some glues are lasting, I think it is best to avoid them altogether and use the tried and true old method of nailing them up. I know of some people who have used glue and 12 months later they are having problems with their panels lifting away from the backing board. My theory is always that you should minimise the possibility of encountering problems by doing the job properly the first time around.”
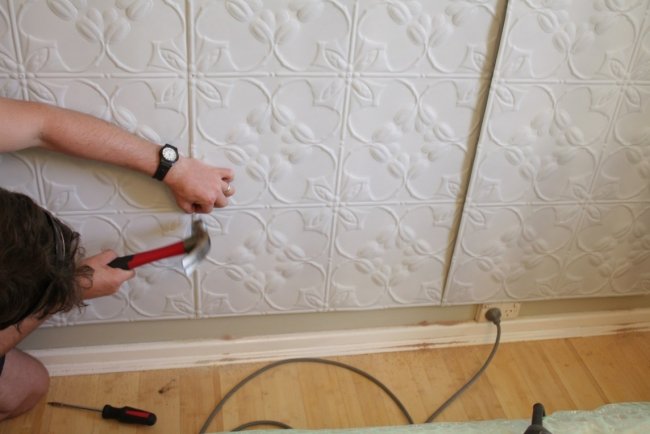
Once we learned how super easy it was to nail the panels into place, I wondered why anyone would ever even think to use glue, full stop! “The nails used are flat headed and tiny and they are only ever placed in the decorative areas of the panels,” says Jean. “After the panels are painted the nails are not really noticeable.”
To nail up the sheets we used a Trojan hammer (and we also a Trojan measuring tape. I keep one in the car. So handy to take about when you are visiting stores. A measuring tape I mean, not a hammer. I am not Thor).
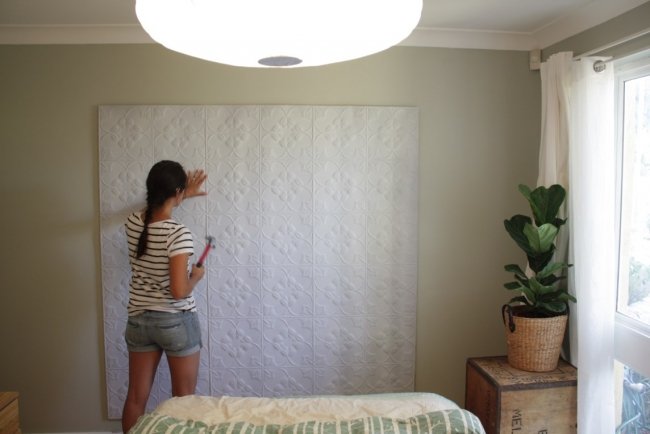
Step 8. Ask your stupid husband to take a photo of you doing important hammering stuff.
Get angry hours afterward when you discover he actually took the picture when you were scratching your nose for a split second.
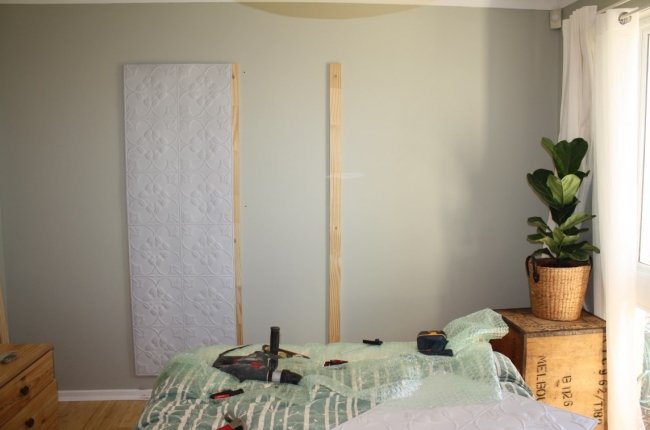
Step 9. Added spice!
If you want to make your pressed tin bedhead that much more special, you can mount framing to the sides and use wood glue to stick it to the plywood or MDF battens.
Step 10. Paint your panels.
Jean says that the pressed tin splashback on House Rules was left unpainted – another no-no. You need to paint! “The installation was poorly done because the panels were glued and then left unpainted and it is taking me months to set the record straight with my customers!” she says. “When the panels leave the factory they are despatched in an unfinished state. They can tarnish over time if left as is.”
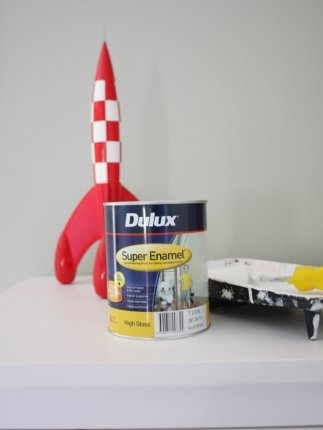
Jean says it is essential to use an etch primer on your panels first followed by two coats of an oil-based enamel paint, ensuring the etch primer is compatible with aluminium and that the top coat paint is compatible with the primer. “I always tell my customers to use the best quality paint they can afford,” she says. “The etch primer is the product that makes the paint stick to the metal so it is important not to omit this step. One of the factories I deal with ordinarily paints the panels with primer before they despatch them which can be a time-saving exercise for the installer.” (The Magnolia panels we used arrive at our doorstep with the primer on them already).


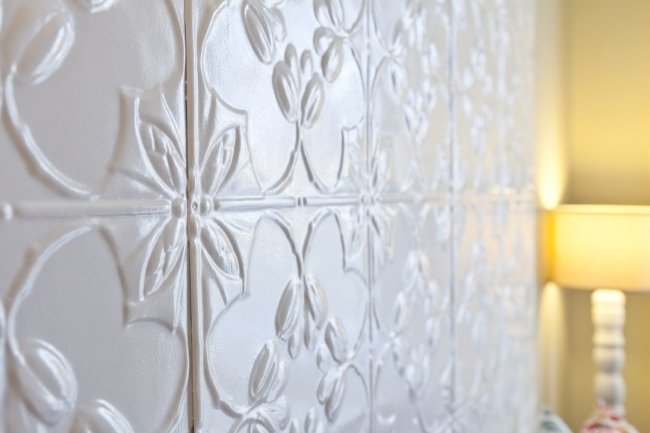
Like the metallic look of unfinished pressed tin? “Some customers like the shiny metal appearance of their panels and they are keen to retain this look,” says Jean. “I always tell them to buy a paint that mimics the metal colour and there are plenty of them around that do so. Painting the panels is important because it enables the nail heads to be covered and some of the paint seeps into the fine hairline joins in the panels thus making the joins appear even more seamless.”
I used Dulux Superenamel in High Gloss as I wanted something glossy and I had been using recently it for our doors, skirtings and steel door frames. I love how it came up and how it looks (it develops a very tough finish) but being an oil-based paint, it is very strong-smelling paint and it took a while for the 'fresh paint' smell to disappear. You could use Dulux Metalshield which comes in a variety of colours. Numerous enamel paints will smell really strongly even in the days to follow after painting. If this will bother you, I would perhaps recommend painting the panels before installation and leaving to dry thoroughly – then after nailing, paint over the nail marks to cover up the joins. Or use a low-VOC, water-based or natural paint.
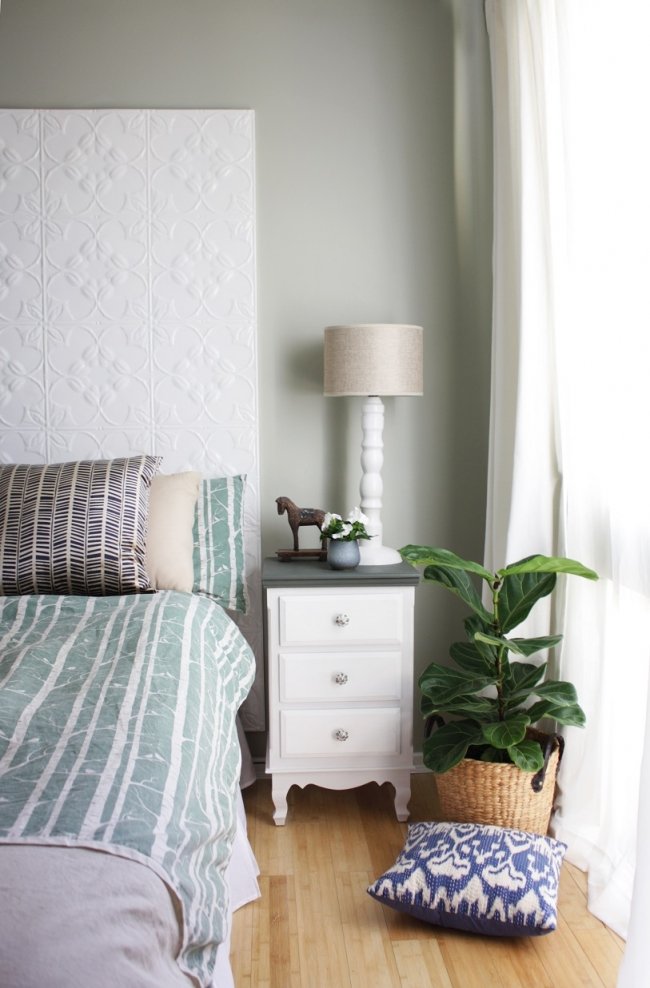
Styling Nelly Reffet of Twinkle and Whistle, photos Heather Robbins of Red Images Fine Photography. Photo Heather Robbins of Red Images Fine Photography.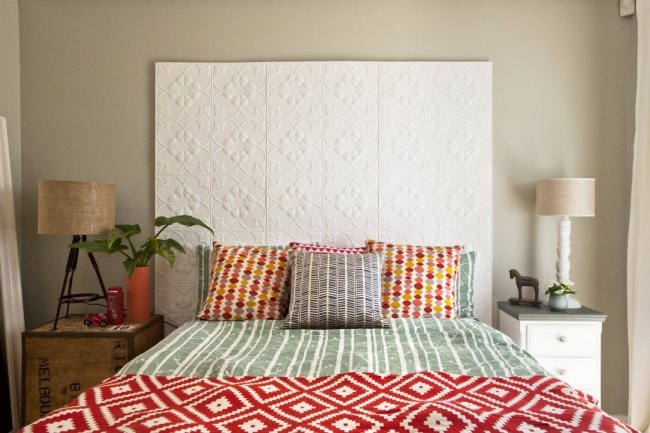
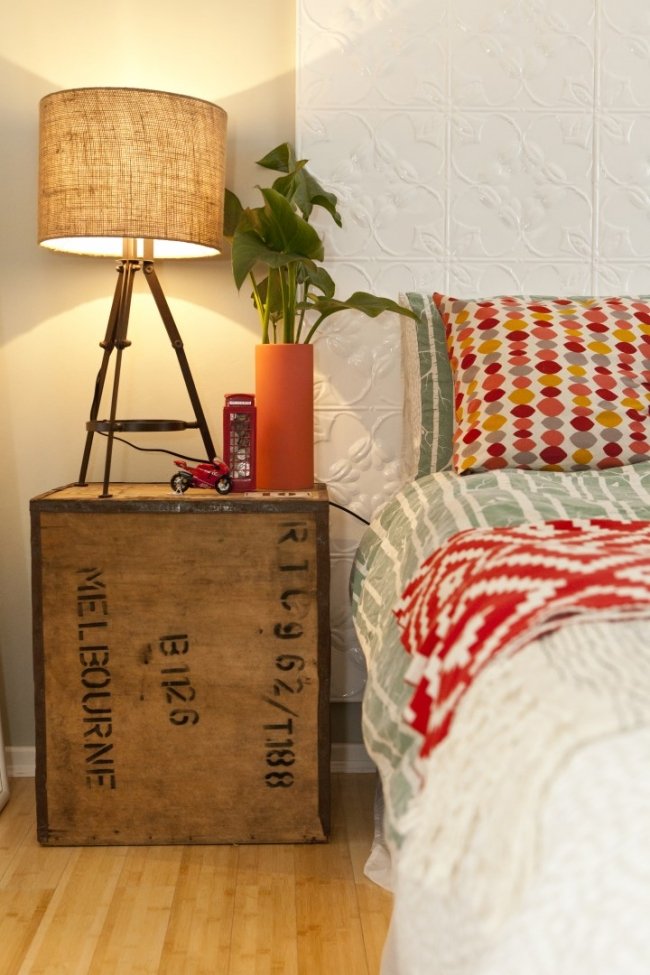
Step 11. Start styling.
With your beautiful pressed metal bedhead done, now is a great time to buy a few treats for your bedroom! Forty Winks group manager Kara Norris says you can easily give your bedroom a lift with a few simple design updates. “Clever colour selections and complementing surrounding furniture and furnishings can transform a dull and uninviting space into a bedroom sanctuary,” she says. Kara’s styling tips:
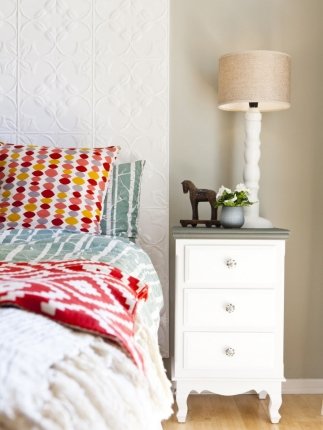
- Bring the outdoors inside with fresh plants, open windows and plenty of light (I bought a fiddle leaf fig for our room, and changing the blinds with white linen curtain and sheers has made it feel light and airy).
- Consider clever storage solutions which maximise space.When choosing colour, consider tones that make you feel comfortable and complement bed linen, carpets, curtains and soft furnishings.
- Consider the bed linen theme you have chosen. You can highlight some colours from your linen to tie in the whole setting together.
- Accessorising with pillows and throws is a great way to introduce bursts of colour.
Step 12. Get a memento.
Ask your friend to take a cheesy photo of you posing in front of your pressed tin bedhead like you made the whole thing all by yourself.
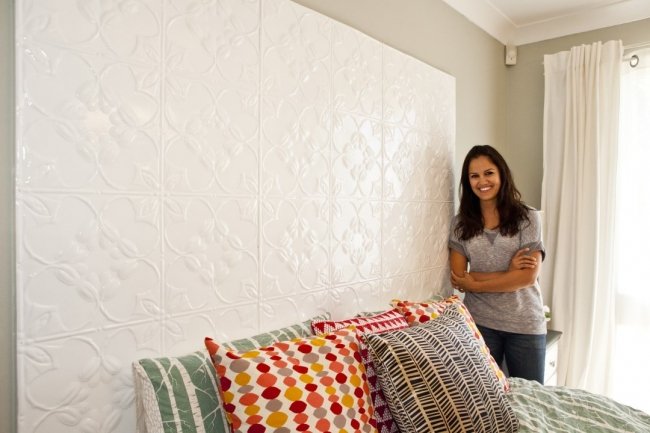
Photo Heather Robbins of Red Images Fine Photography.

WIN A FORTY WINKS SILENT PARTNER ENSEMBLE BED VALUED AT $3,299
Think of all the possibilities for bedheads in your own home if you have a gorgeous ensemble bed! Thanks to Forty Winks, you can WIN a Silent Partner Florence Plush queen size ensemble bed (mattress and base included) with an RRP of $3,299.
This bed is crazy comfortable and has top-quality memory foam and latex which means that you can toss around, jump and the entire bed won’t jiggle and move – meaning your partner hardly feels a thing. The Forty Winks people say the Silent Partner bed has a firm perimeter construction, ensuring a seamless transition from mattress edge to sleep surface, so you have a bigger available sleeping area. The Silent Partner also uses a patented Motion Deflection Barrier, which means it minimises the transfer of motion and enhances your sleeping experience. Which basically means no more getting woken five times in the middle of the night and rising in the morning feeling grumpy at Jiggly Legs next door. You can read more about the Silent Partner bed here.
To enter the giveaway, all you have to do is leave a comment telling me what your dream bedroom would be like.
Feel free to be creative, be weird – you might describe a restful cocoon with dark grey walls and soft white bed linen. Maybe your dream sleeping space would be a casual beachside hut in Goa with the smell of palm trees in the air and a tiny monkey called Gorman who brings you pina coladas. Or maybe you’ve always wanted a ginormous TV on the ceiling. Leave your entry as a comment below and please make sure to include your full name. You can get additional entries by liking Forty Winks on social media - see the links below.
TERMS & CONDITIONS
Competition open only to Australian residents.
Please leave your entry as a comment below with your full name. Alternatively, you can send an email to maya ‘at’ house-nerd.com.
Entries close midnight AWST May 3, 2014.
You can receive up to three more entries into the draw by following Forty Winks on:
Facebook
Twitter
Pinterest
Please make mention in your entry comment if you have done so.
Winner drawn and announced on House Nerd on Sunday May 4, 2014.
Winner has one week to contact House Nerd. If no contact has been made, a winner will be re-drawn.
Good luck guys! Maya x


